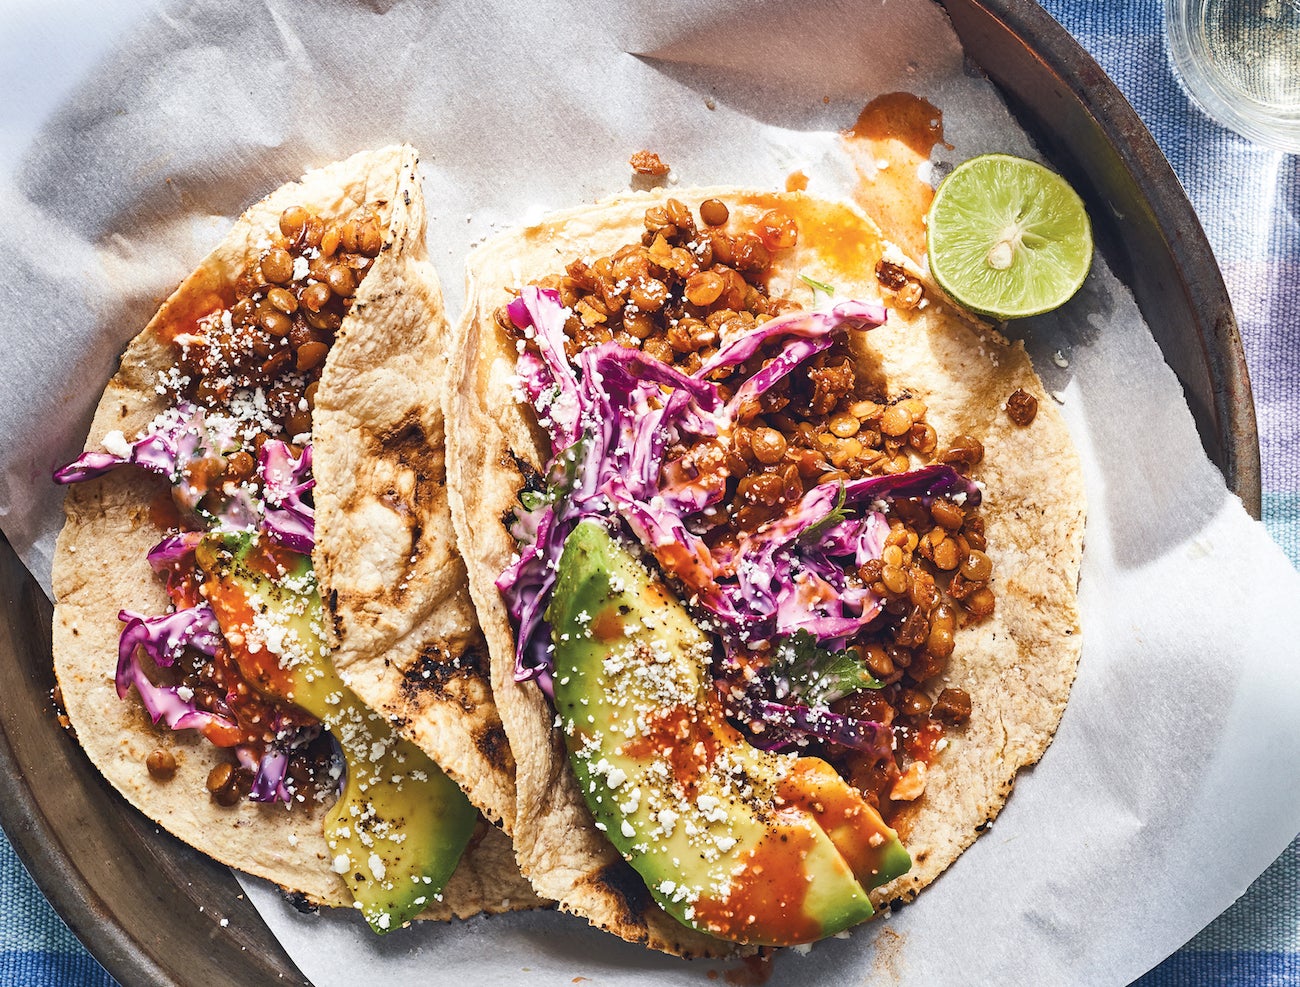
Whether they’re canned or dried, make some space for beans and lentils on the grill.
In the process of writing my latest cookbook, Thank You for Smoking, I smoked pretty much everything I could get my hands on. There were ribs and bacon, of course. But there was also quinoa, cashews, pink peppercorns, and oats.
I was amazed at how smoked walnuts created an even lustier version of pesto, and how the intoxicating fragrance of dried smoked lentils carried itself through the simmering process. Smoking dried beans and legumes created deep, satisfying flavors in all sorts of dips, salads, and taco fillings—no ham hock required.
I found that it was surprisingly easy to infuse pantry staples (both dry and wet) with an intriguing whiff of smoke. The “whiff” component is crucial here, because my aim was (and is) to deploy smoke as a seasoning—not an overpowering presence that obscures everything else on the plate.
In my book, this whiff comes along in two basic ways. You can smoke individual ingredients over indirect heat (in a closed grill that’s vented for smoking, allowing a steady stream of smoke to waft over food and out the vent, keeping air circulating). Or you can cook them over direct heat with a wood-enhanced fire. In other words, adding wood chips, chunks, or even a hardwood log to a bed of coals (or wood chips in a smoke box in a gas grill).
In the book, I offer instructions for smoking both dried and cooked beans. Smoking dried beans yields a more delicate smoky nuance, and starting with cooked beans yields a more pronounced flavor because their moist texture helps absorb the aromas in the cooking chamber. A chef friend takes the middle ground and smokes beans after they’ve been soaked (overnight or for an hour with the quick-soak method). As a longtime bean lover (I wasn’t the only one who survived college on black beans and rice, right?), I was compelled to know the precise differences between smoking beans at each stage. So I decided to spend a Sunday test-driving all three approaches.
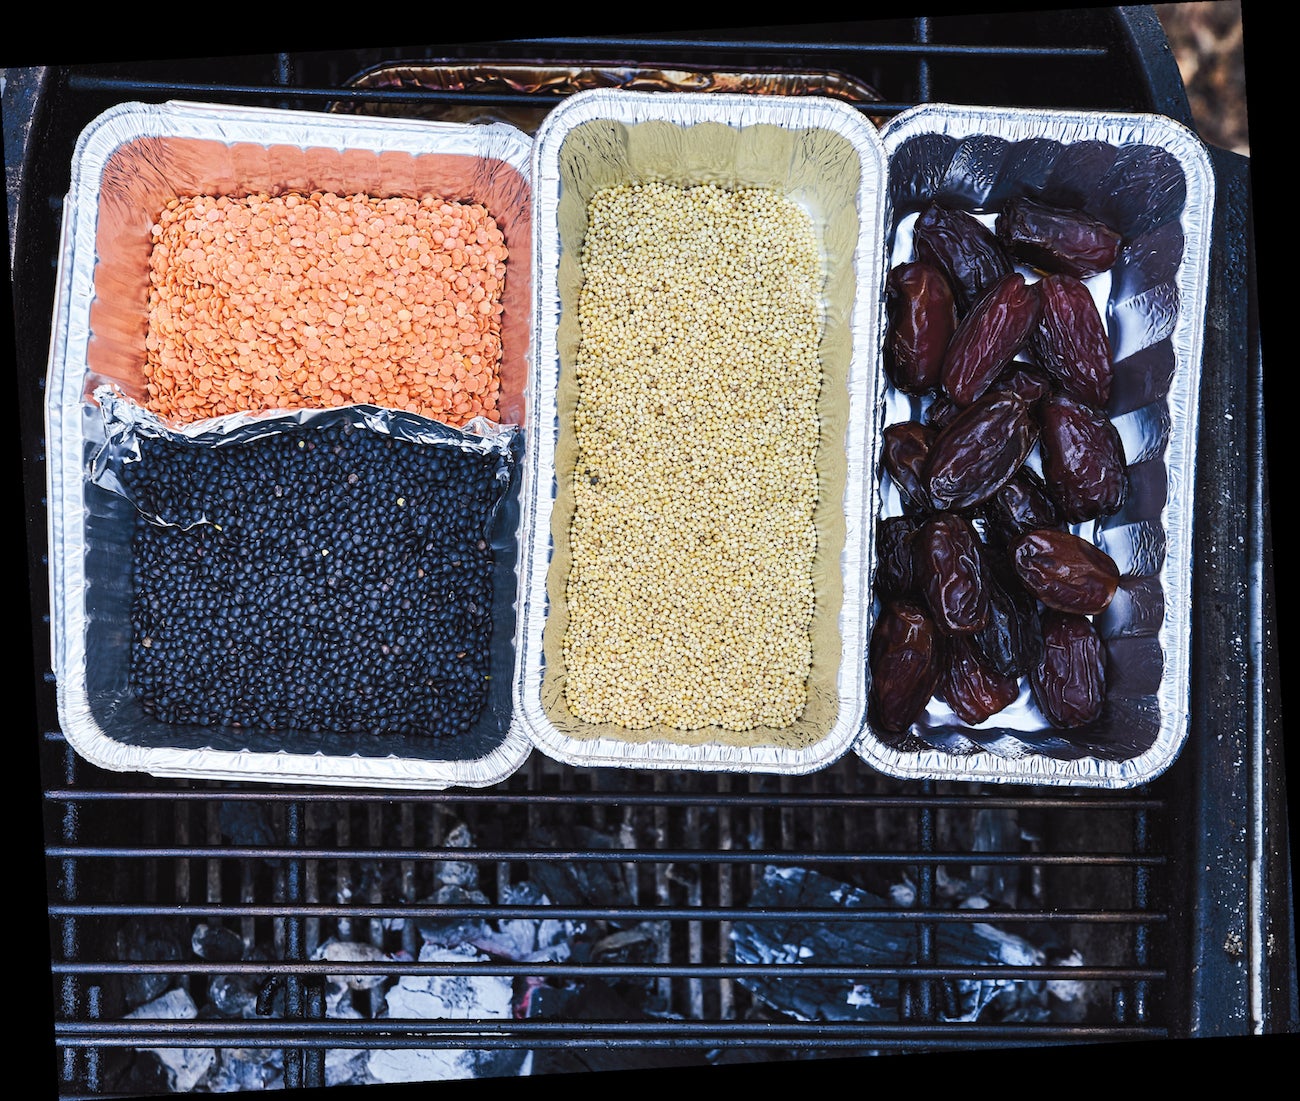
Following the method from my book, I built a two-zone fire, and when the coals were glowing red and covered with a fine gray ash, I placed a drip pan with an inch of warm water on the side with no coals. The water creates humidity that’s essential—especially for dried ingredients—for smoky flavors to “stick.” I placed a pound of each version in disposable aluminum pans (large enough that the layer of beans is no thicker than an inch) on the grate above the drip pan.
I smoked the three batches of pinto beans (dried, soaked, and simmered) for 30 minutes and used oak chunks as my smoke source (one or two chunks per batch, adding additional wood as needed to maintain a steady stream of smoke). My grill maintained a steady temperature of 300° to 325° throughout the process. After smoking, I refrigerated all three batches overnight, so my shift over the fire didn’t hinder my ability to taste and smell. The next day, I finished cooking the soaked beans and simmered the dried beans, served the results in identical bowls, and subjected my husband to a blind tasting. Here’s what we found:
Smoked Dried Beans: The surprising favorite. I simmered the smoked dried pintos (without soaking them), and they cooked into a wonderful “bean-y” texture, meaning they were tender and creamy (not mushy) and held their shape. Best of all, they created a savory broth that had the richness and complexity of beans cooked with meat. Definitely the deepest and most satisfying smoky flavor.
Smoked Soaked Beans: The least favorite. The texture of the cooked beans was somewhat uneven, with a slightly grainy quality. My sense is that the moisture the pintos acquired from soaking was redried and almost partially toasted by the heat and wafting smoke. The smoky flavor was subtle and more of a top note than the deep flavor created by the dried beans.
Smoked Cooked Beans: Because I began with tender beans, the pintos began to break down during the 30-minute smoking process (especially when I stirred them). The result was the most overt “smoky” flavor and a soft, mushy texture best suited to a puree (like the Smoky Bean Dip With Pickled Jalapeños below) or refried with rendered bacon or olive oil that would help balance their assertive flavor.
Of course, all bean varieties are different. If I smoke cooked pintos again, I’ll likely undercook them slightly, so they’ll hold their shape better. And denser legumes like chickpeas are less likely to break down. Canned, drained beans like chickpeas absorb the smoke beautifully (in 20-30 minutes) and make a stellar hummus. If you don’t have time to fire up your grill, you can use a smoking gun (I have a Breville) on cooked or drained canned beans by placing them in a glass jar or metal bowl and following the manufacturer’s instructions to give it a shot or two of wood smoke.
As with grains and nuts, the color of dried beans darkens slightly after smoking, so stir them a few times during the process to ensure even results. Keep in mind that the flavor of cooked smoked beans intensifies overnight, especially when they’re soaking in liquid or some kind of fat (like olive oil or mayo). The subtle smoke you taste just after your lentils are tossed with vinaigrette blooms and becomes more pronounced (in a good way) the following day.
Ingredients
- 1 pound smoked dried Marcella or cannellini beans
- 2 sprigs sage
- 3-4 fresh bay leaves
- 4 cloves garlic, peeled and crushed
- 1 Parmesan rind
- Salt and freshly ground black pepper
- Green Herb Oil
- 1 clove garlic, lightly crushed and peeled
- ½ teaspoons kosher salt
- ½ teaspoons red pepper flakes or crumbled chile pequin
- 2 cups combination of chopped fresh basil, thyme, oregano, dill, or flat-leaf parsley
- ½ cups extra-virgin olive oil
- Tuna
- 2 5-ounce (140 g) cans high-quality tuna packed in olive oil, drained
- 1 shallot, thinly sliced
- Finely grated zest and juice of 1 large lemon
- Kosher salt and freshly ground black pepper
- Grilled bread, for serving
- Lemon wedges, for serving
The time-honored Italian pairing of white beans and tuna is a perennial favorite at our house. You can use any cannellini or white beans for this dish, but my favorite variety is the Marcella beans that I order online from Rancho Gordo, an heirloom-bean grower in California. I toss the warm beans with a green herb oil and top them with the best-quality tuna packed in olive oil. You can also serve the beans with grilled tuna or another fish steak and shaved bottarga, or simmer them with an entire head of escarole (trimmed and chopped) added during the last 30 minutes of cooking.
I can’t resist adding a Parmesan rind to any pot of white beans. I love how the cheese imparts a rich flavor. Even though you drain the beans for this recipe, save the flavorful cooking liquid and freeze it to make white bean soup or minestrone.
Smoked Beans Master Recipe
- Prepare a charcoal grill for two-zone cooking and build a medium-high fire, or
heat a gas grill to high.
- When the coals are glowing red and covered with a fine gray ash, use tongs to
remove the cooking grate and place a drip pan with 1 inch (2.5 cm) of warm
water on the side with no coals, and add your smoke source (chips, chunks,
or log). Return the cooking grate to its position, allow it to preheat, and then
carefully wipe the preheated grill grates with a lightly oiled paper towel. Using
a grill brush, scrape the grill grates clean, then carefully wipe with a lightly oiled
towel again.
- To smoke dried peas, beans, or legumes, place them in a disposable
aluminum pan or atop two sheets of heavy-duty aluminum foil (crimp the
edges of foil upward to create a rim and prevent them from sliding off).
When the fire begins to produce a steady stream of smoke, place the pan
over indirect heat, close the grill, vent the grill for smoking, and smoke for
25 to 40 minutes, until the peas, beans, or legumes are deeply fragrant and
have darkened slightly. For even results, stir the ingredients and rotate the
individual containers (if you’re smoking more than one item) around the heat
after 15 to 20 minutes, and keep an eye on their color after 30 minutes to
ensure they don’t become too dark.
Smoked Cannellini Beans
- To prepare the beans, rinse the beans and discard any pebbles. Place the beans,
sage, bay leaves (to taste), garlic, and Parmesan rind in a large saucepan and
add enough cold water to cover by 4 inches (10 cm). Bring the beans to a boil
over medium-high heat, then turn the heat to low and simmer very gently until
the beans are tender, about 1 hour 15 minutes, skimming off any scum that rises
to the surface. Remove the pan from the heat, and if time allows, let the beans
cool in the cooking liquid.
- Meanwhile, to make the green herb oil, combine the garlic, salt, and pepper
flakes in the bowl of a food processor and pulse into a coarse paste. Add the
herbs and pulse until combined. With the processor running, slowly drizzle in
the olive oil until the mixture pulls together into an even puree, stopping to
scrape down the sides of the bowl with a rubber spatula as needed.
- Drain the beans in a colander and transfer to a large mixing bowl, discarding the
sage, bay leaves, garlic, and Parmesan rind. Pour the green herb oil over the top
and gently toss the mixture until combined. Season with salt and pepper, then
transfer to a large serving platter.
- In the same mixing bowl, combine the tuna, shallot, and lemon zest and juice
and use a fork to gently combine (leaving the tuna in larger chunks, if possible).
Season the tuna mixture with salt and pepper, then use a rubber spatula to
place the mixture on the top of the beans. Serve immediately, with grilled bread
and lemon wedges on the side. Store leftovers in a sealed container in the
refrigerator for up to 4 days.
Ingredients
- 1 pound smoked dried chickpeas
- ½ cups extra-virgin olive oil
- ¼ cups red wine vinegar, plus more as needed
- 2 shallots, or 1 bunch green onions, white and light green parts, thinly sliced
- Kosher salt and freshly ground black pepper
- 1 cup Lunchette Pickled Cauliflower (recipe follows)
- 1 seedless cucumber, peeled and chopped
- ¼ cups chopped fresh dill
- ¼ cups chopped fresh flat-leaf parsley
- Lunchette Pickled Cauliflower
- 2-3 heads cauliflower, cored and cut into florets
- Kosher salt
- 4 cups white wine vinegar
- 1 ½ tablespoons Madras curry powder
- 1 tablespoon ground turmeric
- 4 pods green cardamom
- 4 bay leaves
- 4 teaspoons pepper flakes, or 2 dried arbol chiles
The earthy flavor of smoked chickpeas pairs especially well with bright, vivid flavors like those of pickled vegetables, cucumber, and fresh dill. This beautiful cauliflower pickle recipe comes from my friends Naomi and Joel Crawford, owners of Pizza Politana and Lunchette in Petaluma, California. The pickle recipe makes four quart jars that you’ll be happy to have on hand for snacking and future meals, but you can cut it in half if you prefer.
Lunchette Pickled Cauliflower
- In a large bowl, toss the cauliflower with a generous amount of salt (I use about
3 tablespoons) and let it sit for at least 30 minutes, or up to 1 hour. Rinse and
drain the florets.
- In a pot, combine the vinegar, 2 cups (475 ml) water, sugar, 2 tablespoons plus
1⁄2 teaspoons salt, curry powder, and turmeric and bring to a boil over high
heat. Once the brine starts to boil, immediately turn off the heat.
- Fill each of four 1-quart jars with cauliflower, then add 1 teaspoon cardamom,
1 bay leaf, and 1 teaspoon red pepper flakes (packing the vegetables tightly).
Carefully divide the brine among the jars. Let the mixture cool 15 to 20 minutes,
then seal with a tight-fitting lid. Let the jars stand at room temperature for 2 to
3 days before using, flipping and gently agitating each jar two times per day to
distribute the spices (the longer the flavors have to develop, the deeper they
will be). After that, store the sealed jars in the refrigerator for up to 6 months.
Once opened, they’ll keep in the refrigerator for up to 4 months.
Smoked Beans Master Recipe
- Prepare a charcoal grill for two-zone cooking and build a medium-high fire, or
heat a gas grill to high.
- When the coals are glowing red and covered with a fine gray ash, use tongs to
remove the cooking grate and place a drip pan with 1 inch (2.5 cm) of warm
water on the side with no coals, and add your smoke source (chips, chunks,
or log). Return the cooking grate to its position, allow it to preheat, and then
carefully wipe the preheated grill grates with a lightly oiled paper towel. Using
a grill brush, scrape the grill grates clean, then carefully wipe with a lightly oiled
towel again.
- To smoke dried peas, beans, or legumes, place them in a disposable
aluminum pan or atop two sheets of heavy-duty aluminum foil (crimp the
edges of foil upward to create a rim and prevent them from sliding off).
When the fire begins to produce a steady stream of smoke, place the pan
over indirect heat, close the grill, vent the grill for smoking, and smoke for
25 to 40 minutes, until the peas, beans, or legumes are deeply fragrant and
have darkened slightly. For even results, stir the ingredients and rotate the
individual containers (if you’re smoking more than one item) around the heat
after 15 to 20 minutes, and keep an eye on their color after 30 minutes to
ensure they don’t become too dark.
Smoked Chickpea Salad
- Rinse the chickpeas and discard any pebbles. Place the chickpeas in a large
pot and add enough water to cover with cold water by 4 inches (10 cm). Bring
the chickpeas to a boil over medium-high heat, then turn the heat to low and
simmer until the chickpeas are tender, about 45 minutes, skimming off any scum
that rises to the surface. Drain the chickpeas in a colander and transfer them to
a large mixing bowl. Add the olive oil, vinegar, and shallots, season with salt and
pepper, and toss to combine.
- Set the chickpeas aside to cool for about 10 minutes, then add the Pickled
Cauliflower, cucumber, dill, and parsley and toss to combine. Taste and adjust the
seasonings, adding more salt, pepper, or vinegar as desired. Serve immediately,
or store in a sealed container in the refrigerator for up to 5 days.
Ingredients
- 1 pound smoked dried pinto beans (see method below)
- 1 white onion, chopped
- 3 cloves garlic, thinly sliced
- 2-3 fresh bay leaves
- 1 turkey neck, 3 or 4 chicken necks, 3 slices thick-cut bacon, a ham hock, or 2 smoked chicken wings (optional)
- 1 large pickled jalapeño chile, stemmed and sliced, plus more for garnish
- 1 teaspoon jalapeño brine, plus more as desired
- 1 teaspoon hot sauce (such as Crystal), plus more as desired
- 1 teaspoon pure ground chile powder (such as New Mexico or ancho)
- ½ teaspoons ground cumin
- ¼ teaspoons onion powder
- ¼ teaspoons garlic powder
- ¼ teaspoons cayenne
- Corn chips, for serving
Inspired by the canned variety sold by Frito-Lay (a guilty pleasure, I confess), this homemade version of an iconic Tex-Mex bean dip is way more delicious (without the dubious ingredients). I’d always soaked dried beans before cooking them until a couple friends (and accomplished bean cookers) convinced me to skip this step. Now I simply rinse beans and cook them on the stovetop at a very low simmer, the result is a deeper “bean” flavor and perfectly tender, creamy texture. Adding meat to the bean cooking liquid isn’t essential here, but it creates a richer stock and the added fat creates a luscious texture. I like to simmer pintos with a fresh turkey neck, but you could also use chicken necks, bacon, a ham hock, or a smoked wing or two. Stock up on corn chips and cold beer regardless—even a vegetarian version of this dip will please a crowd with its smoky bean-and-briny-jalapeño essence. You won’t need all the beans
for this dip. Serve the brothy, smoky leftovers in flour tortillas or alongside crispy fried eggs.
Smoked Beans Master Recipe
- Prepare a charcoal grill for two-zone cooking and build a medium-high fire, or
heat a gas grill to high.
- When the coals are glowing red and covered with a fine gray ash, use tongs to
remove the cooking grate and place a drip pan with 1 inch (2.5 cm) of warm
water on the side with no coals, and add your smoke source (chips, chunks,
or log). Return the cooking grate to its position, allow it to preheat, and then
carefully wipe the preheated grill grates with a lightly oiled paper towel. Using
a grill brush, scrape the grill grates clean, then carefully wipe with a lightly oiled
towel again.
- To smoke dried peas, beans, or legumes, place them in a disposable
aluminum pan or atop two sheets of heavy-duty aluminum foil (crimp the
edges of foil upward to create a rim and prevent them from sliding off).
When the fire begins to produce a steady stream of smoke, place the pan
over indirect heat, close the grill, vent the grill for smoking, and smoke for
25 to 40 minutes, until the peas, beans, or legumes are deeply fragrant and
have darkened slightly. For even results, stir the ingredients and rotate the
individual containers (if you’re smoking more than one item) around the heat
after 15 to 20 minutes, and keep an eye on their color after 30 minutes to
ensure they don’t become too dark.
Smoked Bean Dip
- Place the dried beans in a large pot and rinse them a couple times with cold
water. Drain the beans in in a colander and then return them to the pot with
the onion, garlic, bay leaves (to taste), and turkey neck in a large pot and add
enough cold water to cover by 5 to 6 inches (13 to 15 cm). Bring the beans to
a boil over medium-high heat, then turn the heat to low and simmer until the
beans are creamy and tender, about 1 hour, skimming off any scum that rises
to the surface. If time allows, let the beans cool in their broth (this slow cooling
process creates an especially creamy texture). Drain the beans in a colander,
reserving 1⁄4 cup (60 ml) of the cooking liquid (discard any meat and bay leaves).
- Ladle 3 cups (500 g) of the cooked beans and the 1⁄4 cup (60 ml) reserved
cooking liquid into a food processor. Add the jalapeño slices and brine, the hot
sauce, chile powder, cumin, onion powder, garlic powder, and cayenne and blend
until smooth, 3 to 4 minutes. Taste and adjust the seasonings, adding more
jalapeño brine or hot sauce as desired. Serve the dip either warm or chilled—it’s
good either way—with the chips and beer.