Gelatin, pudding mix, Cool Whip: When it comes to whipped cream, these competitive pie bakers have seen it all.
A few years ago, Chris Taylor and Paul Arguin found themselves facing an unusual obstacle. They were on a time crunch during the wee hours of the morning of the National Pie Championship in Orlando, Florida, frantically piping the final flourishes, dollops, and crowns of whipped cream rosettes onto seven pies each, all in the kitchen of a rented condo with limited refrigerator space.
“We were thinking, ‘Boy, I wonder if there’s a way that we can make this just a little easier instead of getting up at 5 a.m. to do this,’” Taylor recalls. This lead to an experiment. They decided to freeze whipped cream to see if it would keep its texture and shape once thawed. To their total surprise and delight, it did.
“It exceeded all expectations,” says Arguin. “You can mold it, you can slice it, and you get these crisp edges.” The revelation meant that a whipped cream topping for a peanut butter and jelly pie could be molded and airbrushed to look identical to a slice of bread. It meant that a frozen disk of whipped cream could be set on top of a Reese’s Pieces–filled pie and airbrushed to look like the moon from E.T.
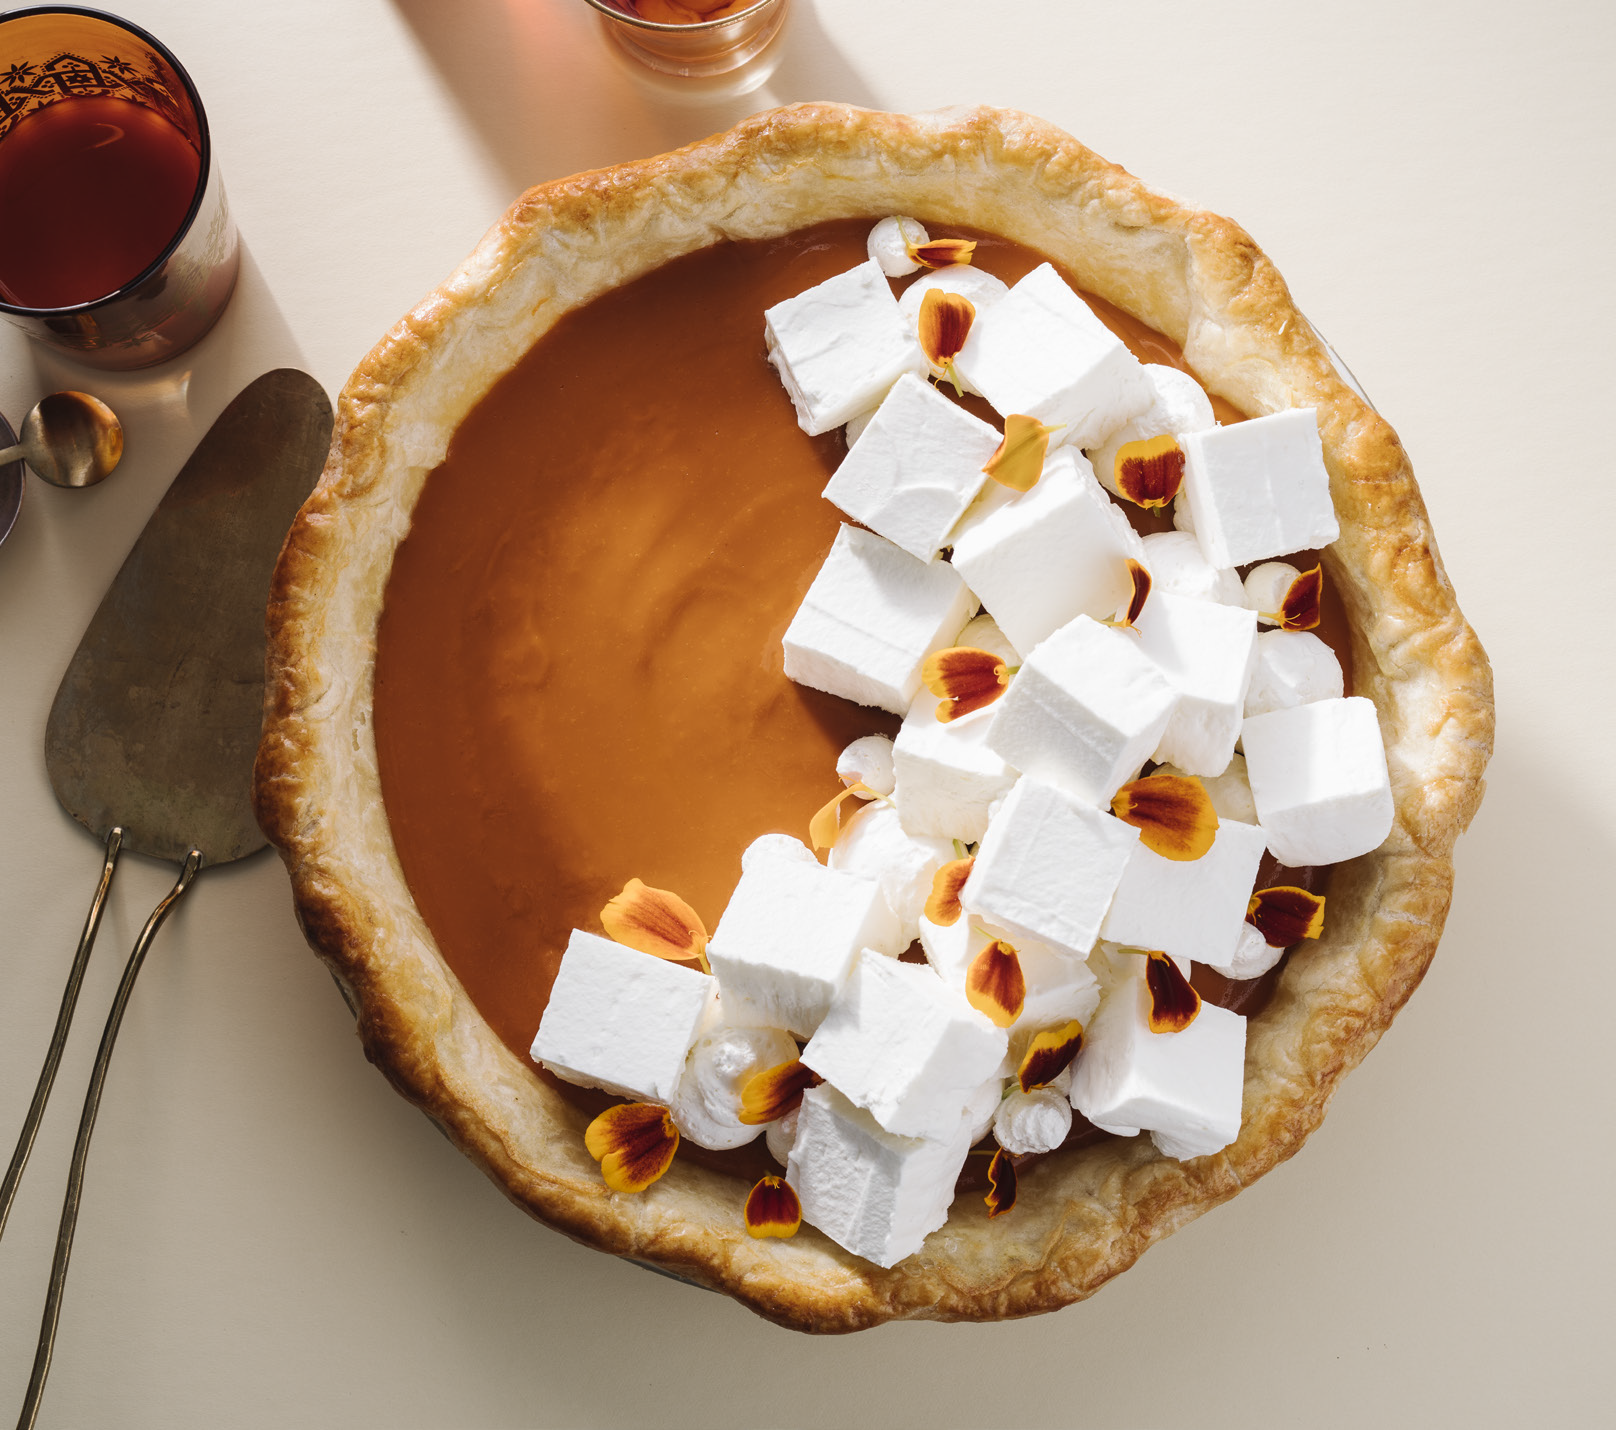
A Thai iced tea–inspired pie is topped with whipped cream that has been frozen, cut into cubes, and thawed.
This is just one of the tricks the Georgia couple has learned over the course of seven years entering the championship (read about last year’s competition here). Each competition brings its challenges (scrupulous packing, wonky rental-home ovens, painstaking transportation of the finished pies), and getting the whipped cream right is crucial to presentation.
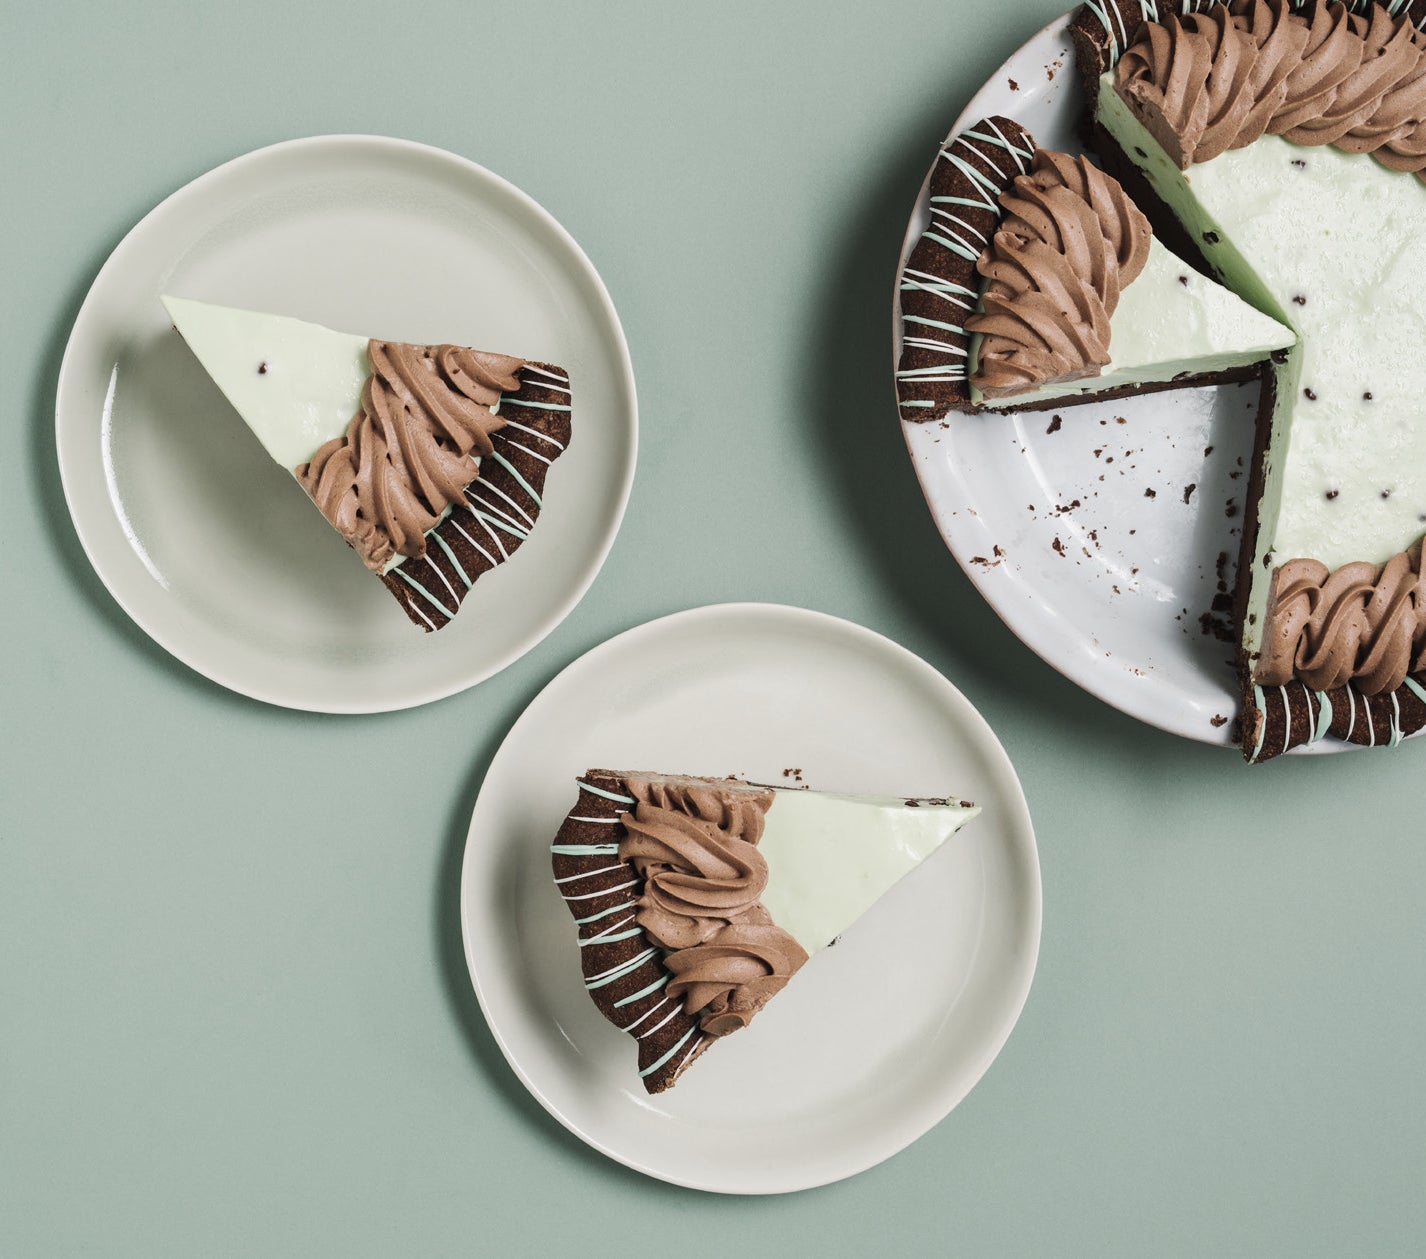
In Taylor and Arguin’s book, The New Pie, whipped cream is flavored with root beer, hazelnut, and molasses. It’s piped into basketweave lattice, St. Honore wedges, and spiraling borders. It’s flattened across the center of a pie crust shield to create an even surface for tiger-stripe cocoa stenciling. It’s frozen into a loaf pan and cut into cubes that hold all of their sharp edges and angles even when thawed (I tried it—it works!).
But as anyone who’s ever tried whipping a bowl of cream four hours before your dinner guests arrive knows, it doesn’t take long in the refrigerator for the stuff to start deflating and for liquid to start pooling at the bottom. Because of this, a lot of competitors turn to Cool Whip as a consistent, reliable secret ingredient. The often-maligned product is low on actual cream and high on xanthan, guar gums, and other ingredients that give it lasting integrity over the course of days in the refrigerator. “I think Cool Whip pipes beautifully, and I think that’s why a lot of people use it. Just by piping you can get some crisp edges,” says Arguin.

For the “Pie of the Tiger,” Arguin and Taylor create a flat surface of whipped cream and stencil cocoa into tiger stripes.
“Personally, we’re whipped heavy cream people. But I know some people aren’t, and if they win awards with Cool Whip, then they win awards with Cool Whip,” says Taylor. “I mean, I like the taste of Cool Whip. That’s just not who we are as bakers.”
Some homemade versions of Cool Whip call for instant vanilla pudding mix, which is packed with starches, and some try to emulate the commercial emulsifiers with a little bit of gelatin (á la Stella Parks). Arguin and Taylor found that the gelatin, which continues to strengthen as it sets, became a little bit too spongy to pass for whipped cream.
They landed on piping gel—a flavorless ingredient made with corn syrup and corn starch. Disclaimer from the book: “It is not an attractive food—think thick and gloppy like a colorless, flavorless canned pie filling.” The gel can be found easily online, and a little spoonful of it will give whipped cream some structure, making it last in the refrigerator without wilting.
For those who are turned off by colorless gels, there are a few other options. Although Arguin and Taylor are hesitant to call them “whipped cream,” toppings that involve cream whipped together with a soft cheese like ricotta or mascarpone also keep their structure a little longer than their cheese-less counterparts, with the benefit of added flavor and richness. “When you add the mascarpone to the cream and whip it like that, it pipes beautifully,” says Arguin. “And it will last for days and days.”
Ingredients
- 1 cup heavy cream, cold
- ½ teaspoons vanilla extract
- 2 tablespoons confectioners’ sugar
- 2 tablespoons piping gel, preferably Wilton (optional)
Real whipped cream is so much more flavorful than anything that comes in a tub or a can. The piping gel is optional, but adding it will stabilize the whipped cream and keep it from slumping or watering out for at least a full day—especially important if you plan to keep your cream-topped pie in the refrigerator for more than a few hours.
- If using a hand mixer or the bowl of a stand mixer fitted with the whisk attachment, whip the cream and vanilla in a medium bowl on medium-high speed until the cream forms soft peaks when the beaters are lifted from the bowl. (You can also whip the cream with just a whisk and some elbow grease if you’re into that.)
- Add the confectioners’ sugar and piping gel, if using. Continue beating the mixture at medium-high speed until stiff peaks form, 1 to 3 minutes. Do not overbeat or the mixture will appear stiff and somewhat curdled. Use immediately or store in the refrigerator for up to 4 hours. If not stabilized with the piping gel, the cream might need to be re-whipped if stored for more than 2 hours.
Ingredients
- Deep-Dish Single Crust
- 1 ½ cups all-purpose flour
- 1 ½ teaspoons sugar
- ½ teaspoons salt
- ⅛ teaspoons baking powder
- 3 tablespoons plus 2 teaspoons vegetable shortening
- 8 tablespoons cold unsalted butter, cut into 8 pieces
- 1 teaspoon apple cider vinegar
- 3 tablespoons plus 2 teaspoons cold water
- MASCARPONE TOPPING
- ¾ cups heavy cream
- ⅔ cups sugar
- 2 teaspoons instant espresso powder
- 1 teaspoon vanilla extract
- 1 cup Mascarpone cheese, cold
- Filling
- 1 medium Granny Smith apple
- 5 cups Italian prune plums, pitted and sliced (from approximately 2 pounds whole)
- 1 teaspoon vanilla extract
- 2 tablespoons brandy
- 2 tablespoons finely ground quick-cooking tapioca, such as Minute
- 1 cup sugar
- 2 tablespoons instant espresso powder
- ⅛ teaspoons salt
- Supplies
- Immersion circulator with water bath
- Vacuum sealer
- Pie crust shield or foil
- Piping bag fitted with a Wilton #4B or other large star piping tip
Alice Medrich has a recipe for Italian prune plums poached in coffee and brandy served over vanilla ice cream. After stumbling across these plums in our farmers’ market, we tried her recipe and decided that this delicious concoction had to be converted into a pie. Thanks Alice! We’re happy to note that these plums have returned to our market every summer. If you can’t find these particular plums, the recipe also works with fresh apricots or thawed frozen sweet cherries.
Deep-Dish Single Crust
- Measure the flour, sugar, salt, and baking powder directly into the bowl of a food processor. Pulse the ingredients once or twice to combine them.
- Scatter the shortening across the top of the flour mixture in three or four roughly equal nuggets. Pulse three to four times until the shortening seems to be evenly dispersed into the flour. If there are still large visible clumps, pulse one or two more times.
- Scatter the butter pieces across the flour mixture, and pulse four or five times. At this point the flour should appear textured, like coarse cornmeal, with small (1⁄4-inch) tidbits of butter flecked throughout. If not, pulse one or two more times.
- If measuring all ingredients by volume (measuring cups), simply combine the vinegar with the cold water and drizzle all the liquid over the flour. If using a scale, place a liquid measuring cup with a spout
on the scale and tare (zero out) the scale to subtract the weight of the measuring cup. Add the measured amount of vinegar to the cup (do
not re-tare the scale); now add the cold water to the vinegar so that the combined vinegar plus water equals the weight of cold water listed in the ingredients. Drizzle the liquid over the flour in the food processor.
- Using 1-second pulses, process the mixture until it transforms from dry and powdery and just begins to form into a large clump of cohesive dough, five to eight pulses. Stop pulsing once most of the dough is clumped together. The dough may look like pebbly curds of cottage cheese and there may be unincorporated flour in the bowl. That is what you want at this point. If you process the dough until it forms one large ball of dough and starts thwacking around in the food processor bowl, it will be overworked and bake up tough.
- Transfer the dough and any remaining unincorporated flour to a smooth work surface (you can use a silicone rolling mat if you like, but we usually do this straight on the counter). To incorporate any loose flour, press and smear the flour across the work surface with the heel of your hand. Gather all of the dough and press it into a 5- to 6-inch disc about 1 inch thick. If making a double batch or a recipe for a double crust, divide the dough into 2 discs using the weights specified in the recipe.
- Wrap the disc(s) in plastic wrap, and smooth the outer 1-inch-thick edge with your fingertips or by rolling the disc along the countertop. These smooth edges will make the dough easier to roll out in a circle. Refrigerate for at least 4 hours but preferably overnight.
MASCARPONE TOPPING
- START THE MASCARPONE TOPPING: In a medium microwave-safe bowl, microwave the cream until it just starts to boil, 1 to 2 minutes, depending on the power of your microwave oven. Using a rubber spatula, stir in the sugar, espresso powder, and vanilla until the sugar and espresso are dissolved. Cover the bowl with plastic wrap and place it in the refrigerator until cold, at least 2 hours.
- MAKE THE FILLING: Set up the water bath for your immersion circulator and start heating the water to 150°F. Peel the apple and grate it using the coarse holes of a box grater. Discard the peels and core. Squeeze the grated apple to remove as much of the juice as possible and break up the clump of grated apple inside a large vacuum-sealable bag. Add the sliced plums, vanilla, and brandy to the bag.
- In a small bowl, whisk the tapioca, sugar, espresso powder, and salt until well mixed. Pour this mixture into the vacuum bag, and vacuum- seal it shut. Cook the plums sous vide in the water bath for 1 hour.
Partial Blind Baking
- Roll the dough to the specified diameter for the pie plate you are using. Remember that the target thickness for a bottom pie crust is 1⁄8 inch. Place the dough in the pie pan and crimp the edges as desired. Freeze the dough-lined pan for at least 20 minutes while preheating the oven to 350°F.
- Lightly spray one side of an 18-inch piece of aluminum foil with cooking spray. Line the crust with the foil, sprayed side down. Fill the pan with pie weights. For deep-dish crusts, use 6 cups. Completely cover the edges of the crust with the foil.
- For a partially blind-baked crust, remove the pie from the oven when the edge is a light golden brown, 40 to 50 minutes. Lift out the pie weights using the corners of the foil. The goal is for the inside of the pie shell to be just beginning to brown. If the pie is too pale, return the crust to the oven without the weights and continue to bake, checking every 2 minutes or until the bottom is just beginning to turn light golden brown in spots. The pie will bake longer after the filling is added, so it should not be completely browned at this point. Partially blind-baked crusts are usually filled hot out of the oven, so keep that in mind when preparing the pie filling.
- The pie will bake longer after the filling is added, so it should not be completely browned at this point. Remove the pie dish from
the oven, set it on a wire cooling rack, and remove the foil or parchment and pie weights. Keep the oven at 350°F.
Filling
- FILL THE CRUST AND BAKE: Remove the plum bag from the water bath, and dry it off with a kitchen towel. Place a pie crust shield on
the pie to prevent splashes. Cut open the bag and pour the filling into the warm crust. Use a bench scraper to get out all the juices. The filling will look quite loose at this point, but don’t worry; it will thicken up
in the oven.
- Keep the pie crust shield on and bake on the bottom rack of the oven until the plum filling starts to gently bubble at the edges, about 25 minutes.
- Remove the pie from the oven, remove the pie crust shield, place the pie on a cooling rack, and allow the pie to cool completely, at least 4 hours, before serving.
Topping
- ADD THE TOPPING: When ready to serve the pie, complete the filling by adding the mascarpone cheese to the chilled espresso cream. Beat with an electric mixer until stiff peaks form, about 2 minutes. Spread this topping onto the chilled pie and smooth with an off set spatula or pipe it decoratively on top of the pie using the prepared bag. (Any leftovers can be stored in the refrigerator for up to 3 days.)
Ingredients
- Cocoa Graham Cracker Crust, baked and cooled in a 9 1⁄2-inch deep-dish pie
- 13 graham crackers, broken into several pieces
- 6 tablespoons unsalted butter, melted
- ¼ cups Dutch-process cocoa powder, sifted
- ½ teaspoons instant espresso powder
- 1 teaspoon vanilla extract
- ¼ cups light brown sugar, lightly packed
- Pinch of salt
- Filling
- 1 ½ cups heavy cream
- 6 tablespoons Dutch-process cocoa powder
- 1 teaspoon instant espresso powder
- 1 ½ cups sugar
- 2 cups Mascarpone cheese
- 35 Nabisco Famous Chocolate Wafers
- Topping
- 2 cups Vanilla Whipped Cream, stabilized
- 2 tablespoons Dutch-process cocoa powder
- Vanilla Whipped Cream
- 1 cup heavy cream, cold
- ½ teaspoons vanilla extract
- 2 tablespoons confectioners’ sugar
- 2 tablespoons piping gel, preferably Wilton (optional)
- Supplies
- Tiger stripe stencil (we use a zebra stripe stencil, and unless you’re a zoologist, you probably won’t notice)
- Piping bag fitted with a Wilton #66 or other small leaf or star piping tip
Nabisco Famous Chocolate Wafers have been used for decades to create the simplest “cake” ever: stacks of cookies layered and smothered with whipped cream that soften in the refrigerator, transforming into a chocolate cream layer “cake.” This pie is the next step in the evolution of the famous wafer. We arrange the cookies in a cocoa-infused mascarpone cream, creating a cute tiger-striped slice of pie with a cocoa-stenciled tiger stripe on top.
Cocoa Graham Cracker Crust
- In the bowl of a food processor, process the graham crackers until finely ground. If you do not have a food processor or just prefer to do it by hand, place the graham crackers in a plastic bag and crush them with your rolling pin until they have been reduced to ne crumbs. Pour the crumbs into a bowl and proceed with the recipe, stirring in the other ingredients by hand using a rubber spatula.
- Mix together Dutch-process cocoa powder, espresso powder, and vanilla to the melted butter. Pulse in the melted butter mixture, light brown sugar, and salt until the crumbs are moistened throughout, resembling wet sand. Transfer the crumb mixture to a 91⁄2-inch deep-dish pie crust. We prefer the glass Pyrex pans with no lip.
- Using your fingers, spread the moistened crumbs evenly around the bottom and up the sides of the pie plate. Press the crumbs firmly so that they start to adhere all along the inner surface of the pie plate.
- Find a sturdy cup or small bowl with smooth sides and bottom—a 1⁄3 cup dry measuring cup works well. Use
the bottom and side of the cup to compact the crumbs into a smooth even layer. Pay special attention to the area where the sides and bottom of the pie plate meet.
- When you think you have finished, carefully hold the pie plate up to the light and visually inspect it from several angles. Do this carefully (like, don’t turn it upside down or anything!). If you’re using a glass pie plate, lift up
the pan and look through the bottom toward a light source. If you find thick or thin areas or even actual holes, this is your opportunity to correct your mistakes. Scrape o some crumbs from the thick area and move them
to the thin. Compact and smooth crumbs with the cup.
- When you are satisfied, start preheating the oven to 350°F, and place the crust in the freezer to chill for at least 10 minutes.
- Bake the crust for 10 minutes on the middle rack. Depending on the pie recipe, the crust may need to be filled warm or cold.
Filling
- MAKE THE FILLING: Place the cream in a microwave-safe bowl and microwave on high until just starting to boil. Sift the cocoa and espresso powder into the heated cream and stir with a whisk until dissolved. Add the sugar and continue whisking until the sugar is dissolved. Cover the bowl with plastic wrap and place in the refrigerator until completely cold, at least 2 hours or up to 1 day before completing the filling.
- Add the mascarpone cheese to the cold cream and beat with
a hand mixer until the mixture has thickened and holds stiff peaks, 3 to 5 minutes. Spread the filling in the cooled crust.
- Break the first few wafers into shards approximately 3⁄4 by 2 inches in size. Feel free to make use of any already broken cookies in the box
for this purpose. Insert a small wafer shard upright into the center of the pie. Continue inserting shards of wafers into the pie so that their edges are almost touching, forming a continuous line that spirals to the outer edge of the pie. There should be approximately 1⁄2 inch of filling between each row of wafers. The shards of can get larger in size in the outer
rows of the spiral.
- After inserting all of the wafer shards, you’ll notice that the filling may have risen unevenly. Use an off set spatula to smooth the filling back down as much as possible. It is okay if the tips of the wafers are still poking through a bit. They are about to be covered by the topping.
Whipped Cream
- If using a hand mixer or the bowl of a stand mixer fitted with the whisk attachment, whip the cream and vanilla in a medium bowl on medium-high speed until the cream forms soft peaks when the beaters are lifted from the bowl. (You can also whip the cream with just a whisk and some elbow grease if you’re into that.)
- Add the confectioners’ sugar and piping gel, if using. Continue beating the mixture at medium-high speed until stiff peaks form, 1 to 3 minutes. Do not overbeat or the mixture will appear stiff and somewhat curdled. Use immediately or store in the refrigerator for up to 4 hours. If not stabilized with the piping gel, the cream might need to be re-whipped if stored for more than 2 hours.
Topping
- Spread all the stabilized Vanilla Whipped Cream across the surface of the pie, mounding any extra topping toward the middle. Place a metal pie crust shield on top of the pie. The opening should be touching the cream. Using a long straight metal spatula, scrape along the surface of the pie crust shield, removing the excess cream and creating a beautifully smooth surface. Transfer this scraped off cream into the prepared piping bag.
- Place a tiger stripe stencil on top of the cream and sift the cocoa powder onto the surface of the pie. Carefully remove the stencil to avoid spilling cocoa on the pie or making a mess in your kitchen. Remove the pie crust shield. Pipe a small border along the edge of the crust to cover any stray marks left by the pie crust shield.
- Place the pie in the refrigerator for at least 6 hours or preferably overnight. This will allow the wafers to soften into vertical cakey stripes. (Store any leftovers in the refrigerator for up to 3 days.)